![Incomplete Guide of NieR:Re[in]carnation](https://tangptr.com/wp-content/uploads/2022/04/899c8a97bd7e22ae5407aa10905d45be.jpg)
NieR:Re[in]carnation is an online mobile game that can be played on Android cellphones and iPhones. This blog serves as an incomplete guide of this game. This blog is titled “incomplete guide” because even if I tried to be comprehensive, there might still be some points not covered. Although I tried to write in a generic way, all these guide are based on English Server of this Game. It is not necessarily compatible with Japanese Server, any future official server or private servers.
Important Note: the game will end its service on April 29th, 2024. All paid contents are unavailable since Jan.22nd, 2024. If you wish to complete all stories, do so as soon as possible because deep-level stories require a fairly good inventory.
Equipment of Your Deck
There are three types of decks: Quest Deck, Arena Deck and Subjugation Deck.
Quest Decks and Arena Decks are similar: you can equip up to three characters in a deck. However, for Subjugation Decks, you can equip three waves of characters in a deck, with each wave equipping three characters.
When you equip your deck, you should observe the target you are about to engage. There are five element affinities in the game settings: wind, fire, water, light and dark.
The Wind-Affinity suppresses the Water-Affinity, but is suppressed by the Fire-Affinity.
The Fire-Affinity suppresses the Wind-Affinity, but is suppressed by the Water-Affinity.
The Water-Affinity suppresses the Fire-Affinity, but is suppressed by the Wind-Affinity.
The Light-Affinity and Dark-Affinity suppress each other in Quests, but do not resist each other in Arena.
The system will notify you about your enemy’s affinity, so be prepared with this intelligence.
When you equip your deck, you should equip your character with weapons with which the wielder are proficient. The primary weapon determines the elemental affinity of the character. A character can equip up to three weapons: the other two secondary weapons will increment the power of the character. There are six types of weapons: Single-Handed Swords (1H-Sword), Double-Handed Swords (2H-Sword), Spears, Staves, Guns and Fists.
If you equip a non-proficient weapon, the stats will be reduced and the normal attacks will be 1-hit only. The animation will be shorter in order to demonstrate unfamiliarity. This is very useful for Supporters on Subjugation Battles.
Here is a summary list of what characters are proficient in which kind of weapons:
- Gayle (Hunter), Lars (Soldier), Marie (Songstress), Hina (Pupil/Husk), Yuzuki (Student/Husk), 2B (Battler), 9S (Scanner), 2P (Mock Machine), Kainé (Warrior), Zero (Sister), Fox (Insightful Emperor), Joker (Caged Rebel) and Crow (Scheming Justice) are proficient in wielding 1H-Swords.
- Akeha (Assassin), 063y (Prisoner), Yudil (Boor) and A2 (Attacker) are proficient in wielding 2H-Swords.
- Argo (Traveler), Noelle (Weapon), Sarafa (Belle) and The World-Ender (Lad) are proficient in wielding Spears.
- Rion (Exile), F66x (Captive), Saryu (Witch) and Emil (Oddity) are proficient in wielding Staves.
- Dimos (Gunman), Griff (Captain) and Yurie (Ruler) are proficient in wielding Guns.
- Fio (Girl), Levania (Monster), Priyet (Werebeast), and Queen (Virtuous Priestess) are proficient in wielding Fists.
A character can also equip with one companion.
The companion equipped on the character has an independent elemental affinity. When you equip your character with a companion, three things should be considered:
- How much force can this companion increased on this character?
A companion can increase the HP, Attack and Defense. - The companion’s skill attack has its unique elemental affinity. Does it suppress your enemy?
- The companion’s static skill is effective on all three characters of the deck.
A companion has a static skill, which could be either support-type or shutdown-type.
Support-type static skill can increase the attack power for a specific affinity.
Shutdown-type static skill can increase the defense power against a specific affinity.
A character can also equip up to three memoirs.
Each memoir has its corresponding story set. If there are two equipped memoirs from the same story set, this character would earn a small bonus. If all three equipped memoirs are from the same story set, this character would earn a large bonus. Note that memoirs from the new story arc, “The Sun and the Moon”, can grant bonus effects onto all characters on the deck.
You may obtain advanced memoirs by clearing Dungeon Quests and Variation-Event Quests.
However, you do not have to equip memoirs to match a large bonus, especially if you are capable of farming 4-star memoirs. In general speaking, you should use memoirs to increase the critical rate and critical damage multiplier as much as possible. That being said, you will equip your characters with memoirs that have critical stats increment as primary ability and as much as possible for secondary abilities.
A character can also equip with one debris.
A debris grants an extra ability to the character on the deck.
You may obtain debris by awakening a costume to the fifth stage.
Usually, your enemies’ deck has unified elemental affinities. Therefore, you should equip a deck of characters with suppressing elemental affinities. If you are about to equip two characters or more, you should equip one companion with elemental affinity that suppresses the enemies and the other with the same elemental affinity to the enemies. The companion with suppressing elemental affinity should have support-type static skill. The companion with the same elemental affinity to the enemy should have shutdown-type static skill.
When building attackers, you should use passive skills that give “damage up” (e.g.: Elemental Boon, Pursuit, Bold Vigor, etc.) instead of “attack up” (i.e.: Vigor and Valiance”) or “defense up” (i.e.: Aegis and Ward). Buffs like attack-up and defense-up have diminishing returns when they goes beyond approximately 40%. However, damage-up buffs aren’t limited.
Enhancement of Your Deck
A character can be enhanced in ten dimensions: Level up, Rank up, Skill Enhancement, Ascension, Mythic Slabs, Awakening, Exalting, Karma, Remnant and Costume-Bonus. Other than Mythic Slabs, Remnants, Exalting, Ranking up and Costume-Bonus, the character enhancements are all costume-specific.
- Level up: This is the most generic way to increase the power of a character costume. Levelling up a character can enhance the HP, Attack and Defense. Ways to level up include assigning the character to a battle or using enhancement materials. When a character costume reaches an ascension point, a costume bonus is granted on this character.
- Rank up: This enhancement can only be performed by assigning a character to battles. With each rank unlocked, all costumes of a character can be granted a bonus of one aspect. It could be either HP, Attack, Defense, Agility or Critical Rate. In addition, ranking up of a main story character could unlock character quests.
- Skill Enhancement: This is the only way to enhance the power of a character costume’s skill. Enhancement of skills requires potion materials and stone materials. For 4-star character costumes, two “Insignia of Skill” stones are required to enhance the character’s skill to its maximum level.
- Ascension: Ascending a character will increase the level limit of a character costume by 5. The first ascension will unlock the second static skill. Further ascensions will level up the static skills. You can ascend a costume four times at maximum, meaning that the level limit can be increased by twenty.
The fourth ascension of costume will reduce the character skill gauge by 20%. - Mythic Slabs: Enhancement via Mythic Slabs are to be accessed through a separate menu. The enhancement grants effects on all costume of a character. There are two types of slab graphs: Stone-Tower and Cursed-God. Enhancement of mythic slab is walking through a directed acyclic graph. There are three ranks per graph. The next graph can only be unlocked by completing the traversal of all vertices in the rank. Unlocking a vertex in a graph requires either Stone-Tower Slabs or Cursed-God Antler Bits.
- Awakening: Enhancement via Awakening grants powerful enhancement. The first, second and fourth stage grants “Stats Up by Percentage” effect. The third stage unlocks an extra ability. The fifth stage offers no enhancement, but drops something called a “Debris”. Going up a stage consumes one required awakening stone. For two-star (initial) costumes, a Silver Awakening Stone is required. For three-star and four-star costumes, the costume-specific Awakening Stone is required. For Dark-Memory costumes, the Dark Awakening Stone is required.
Typically, the third and fifth awakening reward matters. Stats-up awakenings are trivial. - Exalting: Enhancement via Exalting grants extra level limit of all costumes of a character by 2. You can exalt a character five times at maximum, meaning that the level limit can be increased by ten. When you exalt a character, you can receive 50 gems as reward. When you exalt a character to maximum, you can receive a debris as reward.
- Remnants: You can obtain remnants from Mama Points Exchange shop with 1500 points. Each remnant has different rules of granting extra enhancements.
- Karma: Karma can grant you three extra passive skills once the four-star costume has reached Lv.90. This does not require full ascension if the character is exalted at least three times. Unlocking each slot will require ten Karma Stones. To put a passive skill into a slot, you will pay a few cheap enhancement materials. This is a lottery-based mechanism and can take a lot of materials to obtain the ideal skill.
- Costume-Bonus: when you obtain a new costume or a costume reaches ascension point, a bonus effect is granted to all costumes of the same character. This behavior is similar to Mythic Slabs.
A weapon can be enhanced in five dimensions: Level up, Skill Enhancement, Ascension, Evolution and Refinement. All dimensions of enhancements are specific to a weapon.
- Level up: This is the most generic way to increase the power of a weapon. Levelling up a character can enhance the HP, Attack and Defense. Leveling up a weapon can be done by applying weapon enhancement materials or consume other unused weapons.
- Skill Enhancement: There are two dynamic skills and two static skills in a weapon. Dynamic skills are to be released in a battle only when the gauge reaches the point and then release its effects. Levelling up dynamic skills can increase the power when released and also reduce the time window of gauging. Enhancing weapon skills requires solid materials and stone materials. Depending on the type of weapon, materials required to ascend a weapon differ.
- Ascension: Ascending a weapon can increase the level limit of a weapon by 5 and of all its skills by 1. There are two ways to ascend a weapon: via ascension-hastening pearls or by the same weapon.
- Evolution: Evolving a weapon can increase the level limit of a weapon by 10 and unlock the second static skill of a weapon. Evolution also grant a weapon to increase a star. Most weapons can be evolved only once, but character’s unique weapon can be evolved ten times.
- Character’s unique weapons will manifest on the fourth, seventh and tenth evolutions. Besides the final evolution, manifestation of character’s unique weapon will bring a weapon one-star up and increase the level limit by ten. Each manifestation will increase the power the weapon skills significantly. Evolutions other than manifestations does not increase the power significantly.
- Evolution of normal weapons would require jewel materials, depending on the elemental affinity and the star-level of the weapon. Evolving character’s unique weapons would require jewel materials, character-specific Recalling Light and Light of Memory.
- Evolution of Cursed-God weapons would require Core Fragments, depending on the elemental affinity.
- Refinement: Refining a weapon can increase the level limit of certain evolved weapons by ten and unlocks an extra static skill. Note that not all weapons are eligible to refinement. Only five-star weapons (evolved from four-star weapons) are eligible for refinement. Dark-Memory weapons and free weapons from events are not eligible for refinement.
A companion can be enhanced in only one dimension: Level up. Enhancing a companion only requires food materials. Enhancing a companion can increase the HP, Attack and Defense of the equipped character. Reaching specific levels can enhance the skills of a companion.
Memoirs can be enhanced in only one dimension: Level up. Enhancing a memoir would consume lots of money. So don’t get yourself bankrupted for it. Please note that there are chances to fail the enhancements. In other words, your money will be thrown into oblivion if enhancement of memoir fails. If your budget is tight, it is recommended to enhance your memoir only when a glorious memoir enhancement campaign is on.
On each level, the primary ability of the memoir will be enhanced. The secondary abilities will be upgraded every three times of level-up.
Foraging Materials
There are typically three ways to forage: fighting in battles, exchanging in shops and summoning. Let’s classify the materials we will use: weapon level-up materials, character level-up materials, potion materials, solid materials, stone materials, psychic materials. pearls, textbooks, jewel materials, slab materials, food materials, summoning tickets, medals, coins, shards, golds and gems.
- Weapon Level-up Materials: These materials are to be used for leveling up weapons and pulling Karma for costumes. The primary ways to forage them are by fighting the Guerilla quests, Daily challenges and exchanging the medals. You can also find them by fighting Character quests. However, they produce rather inefficiently.
- Character Level-up Materials: These materials are to be used for leveling character costumes and pulling Karma for costumes. The primary ways to forage them are by fighting Record Event quests, Daily challenges, Main Story quests and Guerilla quests.
- Potion Materials: These materials are to be used for enhancing character skills.
- Standard Potions can be obtained by fighting Main Story quests, summoning by Story Chapter and exchanging in Record Event shops with 10 corresponding medals.
- Advanced Potions can be obtained by fighting Main Story quests, summoning by Story Chapter and exchanging in Record Event shops with 40 corresponding medals.
- Insignia of Skill can be obtained by exchanging in Record Event shops with 800 corresponding medals, in Bookmark shop with 750 Bookmarks and 1600 Bronze Subjugation Coins in Subjugation Battle Coins shop. You can also obtain it by clearing Abyss Tower missions.
- Solid Materials: These materials are to be used for enhancing weapon skills. The primary way to forage them are by fighting Daily quests, summoning by Variation Event, and exchanging in Record Event shops.
- Standard Solids can be obtained by fighting Daily quests, summoning by Variation Event and exchanging in Record Event shops with 10 corresponding medals.
- Advanced Solids can be obtained by fighting Daily quests, summoning by Variation Event and exchanging in Record Event shops with 40 corresponding medals.
- Insignia of Quality can be obtained by exchanging in Record Event shops with 800 corresponding medals, in Bookmark shop with 750 Bookmarks and 1600 Bronze Subjugation Coins in Subjugation Battle Coins shop. You can also obtain it by clearing Abyss Tower missions.
- Cursed-God Crystals can be obtained by exchanging in Silver of Gold Subjugation Coins.
- Psychic Materials: These materials are to be used for enhancing skills of character’s unique weapons.
- Standard Psychic Materials can be obtained by fighting Dark Coin quests and Dark Ticket quests in Easy and Normal difficulties, and exchanging with 20 Dark Coins.
- Advanced Psychic Materials can be obtained by fighting Dark Coin quests and Dark Ticket quests in Hard difficulties, and exchanging with 80 Dark Coins.
- Wish Fragments can be obtained by fighting Dark Coin quests and Dark Ticket quests. The more premium you want to forage, the harder quest you should fight. You can also exchange with Dark Coins or summon over Dark Memory chapter.
- Supreme Adoration can be obtained by exchanging with 2000 Dark Coins, 2000 Bronze Subjugation Coins, or 800 Arena Coins. In rare circumstances, you can obtain it by fighting Dark Memory quests.
- Stone Materials: These materials are to be used for enhancing character skills and weapon skills as auxiliary materials.
- One-star stones can be obtained by purchasing them in Item shop with 500 gold. Summoning them over Variation Event is also viable. You can also fight Character quests to obtain them.
- Two-star stones can be obtained by purchasing them in Item shop with 1500 gold, and in Record-Event shop with 10 corresponding medals. Summoning them over Variation Event is also viable.
- Three-star stones can be obtained by purchasing in Record-Event shop with 50 corresponding
- Pearls: Pearls are to be used for ascending weapons.
- Pearls and Natural Pearls can be obtained by exchanging with Record-Event medals, Bookmarks, Arena Coins and Bronze Subjugation Coins.
- Black Pearls can be obtained by exchanging with Bookmarks, Arena Coins and Bronze Subjugation Coins, clearing Abyss Tower missions or collecting ten pieces of Black Pearls. You can also obtain it by clearing the 15th Quest in Abyss Tower.
- Polycrystal of Thoughts can be obtained by exchanging with Dark Coins. In rare circumstances, you can obtain it by fighting in Dark Memory quests. They are used for ascending Dark Memory weapons.
- Eyes can be obtained by exchanging with Silver or Gold Subjugation Coins. They are used for ascending Subjugation weapons.
- Cognition Crystals can be obtained by clearing Chamber of Dusk: Easy and Normal in Hard Mode. They are used for ascending Frozen-Heart weapons.
- Textbooks: Textbooks are to be used for ascending characters.
- Peaceful Texts and Beginner’s Handbooks can be used to ascend two-star characters. Peaceful Texts are character-specific. You can find first ten Peaceful Texts in the first Hard quest of Main Story, and the rest 30 in Character quests. Beginner’s Handbook can ascend any two-star character. You can exchange in Record Event shop with 50 corresponding medals.
- Battle Texts and Intermediate Handbooks can be used to ascend three-star characters. Battle Texts are character-specific. For Record-Event characters, you can obtain Battle Texts in corresponding Record Event shop with 200 medals to buy ten books. For Dissenting characters, you can obtain Battle Texts in Premium summoning. Intermediate Handbook can ascend any three-star character. You can exchange in Record Event shop with 200 corresponding medals.
- Warfare Texts and Advanced Handbooks can be used to ascend four-star characters. Warfare Texts are character-specific. For Record-Event characters, you can obtain Battle Texts in corresponding Record Event shop with 400 medals to buy ten books. For other characters, you can obtain Battle Texts via Premium summoning and exchange with shards. Advanced Handbook can ascend any four-star character. You can obtain Advanced Handbook by summoning over the Variation Event, summoning over certain Premium titles, and clearing the Abyss Tower missions. Warfare Texts for Dark-Memory costumes can be obtained in Dark-Coin exchange with 10000 Dark Coins for an ascension-set (10 books). Warfare Texts for Frozen-Heart costumes can be obtained by clearing Chamber of Dusk: Hard and Master in Hard Mode.
Advanced Handbooks can also be obtained over Awakening Stone exchange. You may obtain two books per month.
In rare circumstances, you may obtain Advanced Handbooks by shooing the fickle black birds away and by picking up lost items in The Cage.
- Jewel Materials: These materials are to be used for evolving weapons and pulling Karma for costumes.
- Regular Jewels (Ruby, Aquamarine, Emerald, Topaz and Tanzanite) can be obtained by clearing Daily quests and Subjugation quests, by exchanging in Record Event shop with 50 corresponding coins, and by summoning over Variation Event.
- Recalling Light and Light of Memory can be obtained by clearing Dark Memory quests, by summoning over Dark Memory and by exchanging with Dark Coins.
- Zenith Brilliance can be obtained by clearing 40, 100 and 135 Abyss Tower missions, by exchanging with 1500 Arena Coins, 4000 Bronze Subjugation Coins or 100000 Dark Coins, by summoning over Dark Memory chapter, and by collecting 10 pieces of Zenith Brilliance.
Pieces of Zenith Brilliance can be obtained via Arena Weekly Ranking Rewards, so keep a high rank in Arena. The first clearance of the Quest 3 and further in EX Hard Event quest will also grant you a Piece of Zenith Brilliance. The challenge missions regarding Subjugation Battles can grant you two Pieces of Zenith Brilliance when you reaches S1 rank and SS1 rank for the first time.
Dark Memory chapter summons would refresh monthly. If you wish to summon a Zenith Brilliance, you would usually spend approximately 500 tickets per month in order to obtain one monthly. - Core Fragments can be obtained by exchanging with Silver Subjugation Coins.
- Awakening Stones: These materials are to be used for awakening characters. Currently, there is no generic stones which hasten the awakenings for Three-Star and Non-Reborn Four-Star costumes.
- Silver Awakening Stones can be obtained by exchanging in Record Event shop.
- Character-specific Awakening Stones can be obtained by acquiring the duplicates of character costumes. Each duplicate grants an awakening stone. For characters available for sale on Record-Event Exchange Shop, you will find one of the Awakening Stone on Quest 5 of EX Hard difficulty.
- Dark Awakening Stones can be sometimes obtained by the first clearance of Quest 5 from EX Hard difficulty of an event where there is no event-related four-star characters costume. (e.g.: Variation Events)
- Awakening Stones for Frozen-Heart costumes can be obtained by clearing Chamber of Dusk in Very-Hard mode.
- Adamants: These materials are to be used for refining evolved weapons.
- Adamants can be obtained by purchasing certain packs from Premium Shop or by conquering Fate-Boards quests. As a period of Fate Board ends, you will be able to obtain a number of Adamants.
- Adamants for Cursed-God weapons can be obtained by exchanging Shiny Subjugation Battle Coins. Currently, you cannot obtain shiny coins from exchanging gold coins.
- Verses: These materials are to be used for exalting characters.
- Verses of Truth can be obtained by purchasing certain packs from Premium Shop or by conquering Fate-Boards quests.
- Slab Materials: These materials are to be used for unlocking vertices in Mythic Slabs and pulling Karma for costumes.
- Small Slab Fragment can be obtained by clearing Event sub-quests, Dark Memory quests and Guerilla quests. You may also exchange with Medals. Clearing Guerilla quests is the most efficient way to forage them.
- Medium Slab Fragment can be obtained by clearing Event sub-quests, Dark Memory quests and Guerilla quests. You may also exchange with Medals, and Record-Event medals.
- Large Slab Fragment can be obtained by exchanging with Rare Medals and Record-Event medals.
- Cursed-God Antler Bit can be obtained by fighting Subjugation Battles and by exchanging Subjugation Coins.
- Food Materials: These materials are to be used for enhancing companions.
- Food Materials can be obtained by clearing Main Story quests, by exchanging with Medals and Record-Event medals, and by summoning over Main Story and Variation Event.
- Three-Star and Four-Star Food Materials cannot be obtained by exchanging with Record-Event medals, and by summoning over Variation Event. Exchanging with Rare Medals is still viable.
- Summoning Tickets: These materials are to be used for summoning.
- Premium Summon Tickets can be obtained in following ways:
- Exchange with 80 medals in Record Event shops. You can exchange up to 3 tickets per event.
If it is a Crossover event, you can exchange up to 10 tickets. In addition, you can exchange a 10x ticket with 800 event medals. - Exchange with 1000 Medals in Medals shop. You can exchange up to 5 tickets per month.
- Clear 50 Abyss Tower missions to obtain a 10x ticket.
- Exchange with 30 Mama’s Monthly Medals. You can exchange up to 10 tickets per month. In addition, you can exchange a 10x ticket with 300 medals. (Deprecated. This game no longer holds Mama’s Monthly Medals. See Mama Points)
- As an Arena season ends, you can receive certain amount of Premium Summon Tickets according to your rank status.
- Exchange with 15 Mama Points. You can exchange up to 10 tickets per month. In addition, you can exchange two 10x ticket with 150 points each.
- Exchange with 80 medals in Record Event shops. You can exchange up to 3 tickets per event.
- 3-Star+ Guaranteed Summon Ticket can be obtained by exchanging with 180 Mama’s Monthly Medals, 5000 Medals.
- 4-Star Guaranteed Summon Ticket can be obtained by exchanging with 20000 Medals or 500 Rare Medals.
- Variation Event Summon Tickets can be obtained by clearing Variation Event quests. The harder the quest, the more efficient your foraging will be.
- To be more efficient with foraging the tickets, you should also equip your deck with resonant weapons. They can be obtained by summoning over Variation Event and Premium Summons released alongside with the event.
- Copper Summon Tickets can be obtained in any difficulty of Variation Events.
- Silver Summon Tickets can only be obtained in Quest 2 and further in EX Hard difficulty.
- Gold Summon Tickets can only be obtained in Quest 4 and further in EX Hard difficulty.
- Story Chapter Summon Tickets can only be obtained by clearing the Main Story quest.
- Dark Memory Summon Tickets can be obtained by clearing Dark Lair quests and Dark Ticket quests.
- Premium Summon Tickets can be obtained in following ways:
- Medals: These materials are to be used for exchanging.
- Medals can be obtained by selling or ascending two-star and three-star weapons.
- Rare Medals can be obtained by selling or ascending four-star weapons.
- (Copper) Record-Event Medals can be obtained by clearing Record Event quests. The harder the quest, the more efficient your foraging will be.
To be more efficient with foraging the medals, you should also equip your deck with resonant weapons. They can be obtained by exchanging corresponding medals and by summoning through Premium Summons released alongside with the event. - Silver Record-Event Medals can be obtained by clearing the Quest 2 and further of Record Event quests at EX Hard level.
- Gold Record-Event Medals can be obtained by clearing the Quest 4 and further of Record Event quests at EX Hard level.
- Only resonant weapons obtained from premium summoning can grant you extra silver and gold medals. Resonant weapon obtained from the Exchange shop can only grant you extra copper medals.
- Bookmarks can be obtained by selling Battle Texts and Warfare Texts. You cannot obtain bookmarks by selling Handbooks.
- Coins: These materials are to be used for exchanging.
- Dark Coins can be obtained by clearing Dark Lair quests and Dark Coin quests.
- Arena Coins can be obtained by claiming victories in Arena matches, and collecting weekly awards and seasonal awards.
- Subjugation Coins can be obtained by collecting daily and weekly awards.
- Shards: Shards can be used for exchanging.
- Shards can only be obtained by performing Premium Summons on specific sections that can return you shards. Each summon receives one shard.
- Golds: Golds can be used for various purposes.
- Many operations will offer you golds. Unless you are clearing Abyss Tower, you can obtain gold by fighting a mission.
- You can obtain gold by selling items. You might need to regularly sell your piling two-star weapons obtained from Premium summons and low-level memoirs obtained from Variation Event Battles.
- Gems: Gems can be used for gaining stamina and performing premium summons.
- You can obtain free gems by clearing missions for their first times.
- You can obtain free gems by summoning over Variation Events.
- You can obtain free gems by exchanging medals in Crossover Record Events.
- You can obtain free gems by clearing daily missions and challenge missions.
- You can obtain free gems by watching daily advertisements.
Other than the Main Story quests, what is worth playing?
The Dark-Memory Quests
The most time-consuming part of this game is to unlock Dark Memory stories. In order to unlock Dark Memory stories, you must evolve character’s unique weapons. After you evolve a unique weapon to its final stage, you will unlock the once-only Dark Trial quest to receive the Dark Memory character costume.
A Dark Memory character is named “Reborn Xxx”. For example, the Dark Memory character costume of Akeha is called “Reborn Swordmaster”.
To reach the maximum level, most materials are not a big deal. However, the Zenith Brilliance is a very rare material required for evolutions since Stage 4. Therefore, if you have spare stamina, you should be working on obtaining Zenith Brilliance. If you have very limited budget or even no budget at all, you probably can receive up to six Zenith Brilliance per month. (one from Dark Tickets, one from Bronze Subjugation Coins, two or three from Arena Coins, one from NieR-Day campaign and, rarely, one from clearing Dark Memory quests) However, evolving a unique weapon to its final stage requires twelve of them. Therefore, make sure you sort your own priority. If you have some real-world budget, you may to pay to buy premium packs that include Zenith Brilliance, or pull some paid-only summoning that return you (Pieces of) Zenith Brilliance.
Dark-Memory weapons can only be ascended by Polycrystals of Thought, even though it is technically possible to ascend via the duplicate weapons. You cannot acquire duplicates of Dark-Memory weapons at all. You can, however, obtain specific Warfare Texts for Dark-Memory characters from the Dark Coin exchange shop. A set of Warfare Texts for ascension would charge you 10000 Dark Coins.
Clearing the Dark Lair quest offers a considerable amount of Dark Coins and Dark Tickets. If you don’t have sufficient stamina, clearing the quests relevant only to your preferred character is recommended. It is very recommended to clear all Dark Lair quest daily when there is reduced-stamina campaign available.
The Recollection-of-Dusk Quests
The Recollection-of-Dusk Quests significantly restrict the deck layout by placing burdens upon characters on deck. If left unmitigated, the burdens can significantly weaken the characters’ performance in battle. In order to reduce the effect placed by burden, you should consider equipping characters with weapons that have corresponding barriers which mitigate burdens. This indicates that when you receive weapons with barrier skills, you should try to enhance them as much as you can so that you won’t be out of choices as you proceed to conquer Recollection-of-Dusk quests.
As you complete a set of Recollection-of-Dusk quests, you will be receiving the Recollection-of-Dusk series weapons, character costumes, or corresponding enhancement materials. Completion of each set of quests will show you an extra story of the designated character.
Keep in mind that weapons and costumes used in other Recollection-of-Dusk battles cannot be equipped in further battles. This means you should enhance as many weapons and costumes as possible so that you won’t be out of choice. If you feel out of choice, you may reset the progress.
Currently, there are four kinds of burdens in Recollection-of-Dusk Quests:
- Debilitating Bane: Your damage dealt to enemies will be reduced. You do not need to mitigate this burden for healers and supporters unless they also play the role of DPS.
- Miasma of Indolence: Your skill cooldown time will be extended. You must mitigate this burden unless you are purposefully using useless characters to fulfill the team-build requirements.
- Curtain of Darkness: As your turn is over, you will have a probability that you will be blinded. You do not need to mitigate this burden for healers and supporters unless they also play the role of DPS.
- Corrosive Smog: Your maximum HP will be reduced. You do not need to mitigate this burden if you can properly utilize dauntless healers (e.g.: Mechanical Pupil with dark weapons) and revivers (e.g.: Abstract Pupil with light weapons or healers with Glimmering Stephanos).
Refinement for non-subjugation weapons can grant an extra barrier skill to mitigate another burden effect.
Is a Premium Summoning Worth to Pull?
Premium Summoning requires gems or premium summoning tickets. We may classify these summoning by their purposes.
- Event-related summoning may offer you characters and weapons resonant to an event.
- Resonant weapons may grant you extra specific rewards on clearance of event quest. Depending on the difficulty, you may receive extra silver or gold rewards. Ascension of the resonant weapons can grant you even more rewards.
- Resonant characters may grant you extra power in clearing the event quest. Ascension of the resonant characters does not necessarily grant you more extra power. Before the battle begins, you may check out the bonus details.
- Event-irrelevant summoning offer you characters without specific relevance to an event. You will exchange 150 shards for a four-star costume.
- Weekly summoning may grant you four-star costumes for some specific characters. Available four-star costumes may include Abstract, Bloody, Fractured, Bloodless and Lacrima series.
- Monthly summoning may grant you four-star costumes for all characters. Available four-star costumes may include Abstract, Bloody, Fractured, Bloodless and Lacrima series.
- Festival summoning may grant you four-star costume for all characters. Available four-star costumes varies. You may be able to exchange costumes from Summer, Celebratory, Yuletide and New-Year series.
- Once-only multi-step summoning offer you characters without specific relevance to an event.
- Completion of all steps causes such summoning becomes unavailable to pull.
- Completion of certain steps will return you specific rewards, but it does not return you shards for exchanging.
- Such summoning can be either paid-only or free.
Aspects of evaluating whether a summoning is worth to pull may include the following:
- Aesthetics: One or more of the costumes offered in this summoning look pretty to you.
- Economics: You have sufficient fortunes to pull this summoning.
- Power: One or more of the costumes offer powerful force.
- Rarity: This costume is somehow unlikely to reappear in short future.
Costumes from Abstract, Bloody, Bloodless, Fractured and Lacrima series will return very soon and can appear in generic summoning.
Costumes from Summer, Celebratory, New-Year and Yuletide series will return in half a year.
Costumes from crossover events are not guaranteed to return. You might miss that forever.
Resurrected Events
The server hosts may resurrect an event. In resurrected events, quests cleared in previous periods are considered cleared, so you cannot receive First-Time gems rewards. However, quest missions are reset. You can earn rewards by satisfying the details of the missions. The shop in Exchange is also reset, so you may still keep on repeating on missions and exchange for items.
Abyss Tower Missions
Abyss Tower missions are high-difficulty missions that you do not want to repeat a lot. To be honest, it is also unnecessary to repeat like you will do in other sorts of quests. For Abyss Tower missions, you can only receive rewards from first time clearance. You will repeat only if the quest was not fully completed. If you repeat on a fully-completed quest, you will receive no reward at all, not even player or character experience points. You can receive additional rewards from completing a certain number of missions. These rewards are quite precious, so try to clear as many missions as possible. When you clear the final quest of the Abyss Tower, you will receive a commemorative badge as an incontrovertible proof that you have vanquished the foes in the deepest part of the Abyss Tower.
Abyss Tower missions can be resurrected. In each resurrection, ten additional quests are available. Likewise, you can receive an additional badge to prove you have traversed the Abyss Tower. However, do not expect this resurrection would appear in an ordered cycle. For example, the Burning Prison III, where foes are fire affinity, appeared before Shadowy Cave II, where foes are dark affinity.
Since Mar.21st, 2023, Abyss Tower missions became permanent sub-quests. There are 50 quests for each tower and 5 towers in all.
Abyss Tower events come with Abyssal costume summoning. However, Abyss Tower quests have no resonant weapons or characters. These summoning are intended for another event quest which comes with this Abyss Tower events. Please note that costumes from Abyssal series are extremely powerful. Even the Dark-Memory costumes are no match to them.
Loadout for Abyss-Tower
The strategy for Abyss-Tower missions is different from regular quests like Record Events and Variation Events. It is typically safer to clear regular quests with a hyper-turret loadout, meaning that you should use three most offensive characters to engage in the regular quests. For Abyss-Tower missions, nevertheless, you will want to include a healer to engage (e.g.: characters like Abstract Captive, weapons like Divine Staff, Companions like Tome: Blood & Sacrifice) in your deck.
If you want to clear a mission that requires all of your characters have a specific percent of HP remaining, you can equip a hyper-turret loadout (only if you can kill the boss before it can deal damage) or use two healers (gain as much HP as possible if one healer is insufficient).
If you want to clear a mission that requires to deal specific amount of damage in one hit, you should use a powerful turret with a high damage per hit as its character skill. Tome companions can be used since most of them can deal 340% damage.
The “Glimmering Stephanos” (unique weapon of Reborn Revolutionary) is not a good choice. It can revive your allies indeed. However, reviving your dead ally does not grant you clearance of no-incapacitation quests. For healers, weapons with healing skills should prioritize than this.
For turrets, you must use memoirs to increase critical rates and damages, and attack power.
For healers, you must use memoirs to increase HP and defense power.
Memoirs from story arc of “The Sun and The Moon” are also viable options for healers to boost up the turret allies since these memoirs are effective on all allies.
Fate Board Missions
Fate Board missions are high-difficulty missions that you do not want to repeat a lot, similar to the Abyss Tower missions. You can only receive rewards from first time clearance. You will receive no regular reward, including items, golds and experience points. You can receive additional pieces of black pearls from completing a certain amount of missions, so try to clear as many missions as possible.
Fate Board missions has alternating elemental enemies. For example, in “Fate-Board: Shadow”, the Quest 1, 3, 5, 7, 9 has Dark-Affinity enemies while Quest 2, 4, 6, 8, 10 has Light-Affinity enemies. To conquer Fate-Board missions, it is recommended to equip your character with three weapons of the same elemental affinity since the mission can grant you extra stats on specific elements of your weapon. In addition, doing so can grant you elemental boon and haste bonus in case you have these weapons.
There are five quests per board. Quests from 1 to 4 of the board will grant you some Adamants to refine weapons. Quest 5 of the board will grant you Verse of Truth to exalt characters. A new board will be released every two weeks. By completing a specific number of missions, you will be granted certain materials. At the end of period, you will receive periodic rewards depending on how many quests you have cleared.
You can follow the similar maneuver in building your deck like Abyss-Tower missions.
Subjugation Battles
Subjugation battles will require you set up three waves to beat a moose with a time limit. This battle mode requires players to deal damages as much as possible. A full-DPS roster is not viable because supporters can increase the DPS’ damage amount more efficiently. The roster depends on how much you can deal. If you can reach damage cap very easily, you may use less supporters and more DPSes. It is recommended to have one DPS and two supporters per wave.
Your goal is to maintain as much damage buff as possible. Ideally, you should reach 100% attack up via Valiance and 100% defense down buff via Render.
- Valiance: Increase all allies’ attack power. This buff will cap at 100% but it will stack and extend.
- Render: Decrease enemy’s defense power. This buff will cap at 100% but it will stack and extend.
- Assault: Increase all allies’ critical rate. This buff will cap at 100% but it will stack and extend. This is typically unimportant unless you pursued a higher critical damage.
- Lethal: Increase all allies’ critical damage. This buff will cap at 100% but it will stack and extend.
- Support: Increase all allies’ elemental damage. This buff does not cap, can stack, but can’t extend.
- Crush: Increase the elemental damage the enemy will receive. This buff does not cap, can stack but can’t extend.
- Ire/Onslaught: Increase all allies’ chain damage. This buff does not cap, can stack but can’t extend.
- Stack-and-Extend buff (Valiance/Render/Soldier/Assault/Lethal): The effect will stack additively, and extend the total effect according to longest remaining time. You will need some 45s/60s source to help stacking.
Assume you have three buff skills, first lasts 45s and uses on 0th second, second lasts 60s and uses on 30th second, third lasts 30s and uses on 45s second. Each has 30% effect.
From 30th second, the effect will have 60% effect and last until 90th second.
From 45th second, the effect will have 90% effect and last until 90th second.- Albeit this kind of buff stacks additively, the effect is multiplicative. For example, if your Assault buff (Critical-Rate up Buff) is stacked at 100% and your original critical rate is 45%, the critical rate under the buff’s influence is 90%, rather than 145%.
- Support/Crush: The effect will stack additively, but won’t extend the effect.
Assume you have two buff skills, both last 30s and have 30% effect; the first was used on 0th second and the second was used on 15th second.
From 0th second to 15th second and from 30th second to 45th second, there are 30% effect.
From 15th second to 30th second, there are 60% effect. - Ire/Onslaught: The effect will stack multiplicatively, but won’t extend the effect.
Assume you have two buff skills, both last 30s and have 30% effect; the first was used on 0th second and the second was used on 15th second.
From 0th second to 15th second and from 30th second to 45th second, there are 30% effect.
From 15th second to 30th second, there are 69% (130% x 130% – 100% = 69%) effect.
The supporters must use non-proficient weapons in order to reduce the animation time of their actions and guarantee their normal attack to be one-hit. The DPSes may use any high-power but correct-element weapons to deal as much damage as possible.
The supporters should use the “Seafaring Cradle Tales” memoir set to boost up the DPSes’ attack power. If your supporters have issue in surviving, then give your vulnerable supporters memoirs with HP up main ability. Otherwise, give your supporters one critical-rate up main and two attack-up main memoirs.
The DPSes should try to aim at 100% critical rate and as much critical damage as possible.
Damage dealt by skills will increase the knockdown gauge. Once the gauge reaches maximum, the moose will enter a knocked-down state. Your goal is to deal DPSes’ character skills twice during knockdown state. You may use your character skill at the beginning, and uses two weapon skills and a companion skill later. You should be able to charge character skill very soon again by doing a few normal attacks.
The fast-forward mode should be used carefully. You should use fast-forward mode when charging weapon-skills. You should disable fast-forward mode when your skills are releasing. You should always disable fast-forward mode the entire time throughout the knock-down state.
During knockdown, all hits are always considered on the first-shot of combo. Therefore, combo-length dependent skills will deal a minimal amount of damage. As a result, Reborn Has-Been, for example, is strongly unrecommended in subjugation, even though he is excellent in other quests.
God-Quests
There are two God-Quests in Main Quests line: the Cursed-God and the Afterlife-Messenger. You may locate the Cursed-God before running into Quest 10 of Chapter 8 “Piles of Leaves”. You may locate the Afterlife-Messenger before running into Quest 7 of The Sun III “Twilight” / The Moon III “Daybreak” by taking the right fork path instead of the left.
The Cursed-God looks like a moose and has Dark-Affinity. Suggested Force to beat it is 150000. It should be easy for players who had already achieved 120000 force in full Light affinity.
The Afterlife-Messenger looks like a coelacanth and has Water-Affinity. Suggested Force to beat it is 300000. It has hyper-defense and recovery skills. The most efficient method is to use a wind supporter and two wind DPSes. For wind DPSes, passive skills like “Pursuit”, “Tempest Boon” are the most effective options of weapons. For wind supporters, active skills like “Crush”, “Ire”, “Render” and “Valiance” are the most effective choices of weapons.
Here is a candidate list of wind supporters:
- Gayle: Bloody Hunter
- Dimos: Fractured Gunman (Highly Recommended)
- Argo: Bloody Traveler
- F66x: Lacrima Captive, Abyssal Captive (Highly Recommended)
- Lars: Phantasmal Soldier (Can be both DPS and Supporter), Fractured Soldier
- Levania: Lacrima Monster (Highly Recommended)
- Marie: Abstract Songstress, Summer Songstress (Highly Recommended)
- Yudil: Abstract Boor
- Hina: Celebratory Pupil
- The World-Ender: Alternate Lad (Highly Recommended)
Here is a candidate list of the most powerful wind DPSes.
- Yurie: New Year Ruler
- Saryu: Abyssal Witch
- Gayle: Festive Hunter
- Yuzuki: Mechanical Student
- Yudil: Reborn Usurper
- Akeha: Abyssal Assassin (By virtue of her character skill, Wind Crusher who can increase wind damage enemies will receive is required, e.g.: Fractured Gunman, Abyssal Captive, Lacrima Monster, Alternate Lad)
The Dark-Memory Griff (Reborn Has-Been) can be a free wind DPS. Considering the nature of his character skill, you should make the combo chain as long as possible.
Stray Scarecrows
There should be only four scarecrows in a chapter. However, there might be extra scarecrows appear in the map. Such scarecrows are called the Stray Scarecrows, and they don’t have weapon memories. You may locate them by checking out the map. Completing a Stray Scarecrow quest may drop a Mysterious Crystal. You may exchange that with something in the shop.
Quests induced by Stray Scarecrows requires a deck loadout with a specific combination of characters. All three characters are pre-defined. You can only choose different costumes for them. The suggested force for clearing such quest is far greater than the final quest on Very Hard difficulty in that chapter.
Such quest has only one wave and it is a boss battle. If your deck is not strong enough, I recommend you do a manual battle, scheduling your combos and timings, in order to defeat it. There are no missions in a Stray Scarecrow, and you just need to beat it once. This indicates you don’t have to consider to fulfill conditions other than defeating the boss. (e.g.: You don’t have to make no members in deck are incapacitated)
In-Battle Maneuver: Concentration
You can tap on the specific target on the top-left in order to concentrate your attacks. In this regard, you can take out the most troublesome enemy (e.g.: it can inflict poison, burn, stun, or blindness to you, reviving your enemies, or inflicting tremendous damage) in a wave at the very beginning. Concentration can also help you schedule your damage so that there would be little damage wasted. You may also waste some acceptable amount of damage in order to ensure the death of your specified enemy. It depends on your evaluation of trade-offs.
Concentration is very useful on high-difficulty quests like Abyss Tower. However, you cannot use concentration if repeating is enabled. Also, concentration is useless when your enemy is in provoke state. It will draw your deck’s attacking attention to some tank costumes.
In-Battle Maneuver: Scheduling the Combo and Timing
In order to do maximum combos, you must cancel the Auto-battle. Then, wait until all characters’ weapons reach their maximum skill gauge. Release your skills by tapping on their corresponding buttons. Note that the enemies’ skills can interrupt your combo, so if it is acceptable (e.g.: no character is on verge of being incapacitated), wait your enemies to complete their skill gauges.
Your fingers might not be very quick. You can cancel the fast-pacing mode in order to grant you more time to pick your skills to be released.
In order to inflict most damage, you should sort your picking by amount of damages each skill can exert in that number of combo affects the damage multiplier. When the combo reaches 20x, damage will be multiplied to 200%. Any combo hits after the 20th hit will be multiplied with 200%. In this regard, you should put low-damage skills at the beginning, and high-damage skills at last. Also, skills that increase attack power (“(Bold or Caged) Vigor”, “Valiance”, or elemental “Boon”), critical rate (“Ambush”), critical damage (“Fatal” or “Assault”), chain damage (“Pursuit”), or that reduce enemy stats (“Ripper”, “Render”) are recommended to be placed before skills that increase defense (“Aegis” or “Ward”), agility (“Fleetfoot” or “Soldier”), exert high damage (“Blitz”), or inflict special state (Stun, Poison, Burn, Blindness, etc.).
Scheduling the combo and timing is very useful on high-difficulty quests like Abyss Tower and Fate Board missions.
Arena
In general, there are eight kinds of roles in Arena: (Note that a costume can play one or more roles.)
- Turret: This role is the DPS that will equip “Blight Flowers” (a.k.a. Cooldown-Reduction, CDR) memoirs and pull Haste Karma in order to hasten the skill exertion toward the enemy. The goal of the turrets is to use the powerful and quick skills to annihilate enemies without giving them a chance to survive. Ideal weapons for turrets should have quick cooldown skills such as subjugation weapons (named with Blackhorn prefix).
Most costumes with a good attack power can be a candidate as a Turret. With the presence of Agility Sniper, the Attacker and Sniper Supports are recommended to be Turrets. - Agility Sniper: This role is the vanguard of the team that will use first-hand normal attack to attack enemies. If properly built, a sniper can kill an enemy with a 3-hit normal attack. In order to gain first hand, snipers must be equipped with sufficient agility stats. This is a risky strategy since the number of attacks and whether the enemy would dodge or not aren’t guaranteed. However, it is also risky if your enemy gains all first-hand on normal attack in that they can annihilate your team before your turrets complete skill cooldown.
A good candidate of agility sniper should have innate “Fleetfoot” passive skill in order to gain a higher agility. The “Pursuit” and “Bold-Vigor” passive skills are also preferred. Bold-Vigor is preferred to Pursuit because it does not rely on randomness. In order gain absolute and powerful first-hand turn, Sniper Support and Attacker Support units are also preferred.
Some costumes have a base agility of 1100 (e.g.: Abstract Ruler) or even 1200 (e.g.: Yuletide Soldier), which is different from regular 1000 agility. Such costume would have even faster move since agility multipliers passive skill can increase even more agility. For example, Lars has 100 flat agility and 5% permanent agility multiplier from his rank bonus. As a result, Yuletide Soldier has 1200*(100%+5%)+100=1360 agility without any other permanent agility additions. If he is equipped with a weapon having permanent Fleetfoot passive skill or there’re agility supporters who provide permanent agility multipliers, the boost is more significant. For example, Celebratory Pupil has 30% multiplier from Soldier passive skill. Yuletide Soldier can gain 1200*30%=360 permanent agility, instead of 1000*30%=300.
With “Training”, “Mastery” or “Proficient” passive skill, an Agility Sniper could have more number of normal attacks in order to kill an enemy.
Please note that the temporary agility multiplier caps at 100%. Any more than that is useless. For example, “Mechanical Hunter” (with 40% permanent agility multiplier) has higher potential agility than “Celebratory Hunter” (with 50% temporary agility multiplier): Gayle’s rank agility gives 100 permanent agility and 5% permanent multiplier. Assuming she gains 150 agility from Karma, Mechanical Hunter will have 1700 permanent agility and Celebratory Hunter will have 1300 permanent agility. If both of them reaches 100% temporary agility, Mechanical Hunter will have 3400 agility while Celebratory Hunter will only have 2600 agility.
You can gain agility from snipers’ Fleetfoot passive skill, supporters’ Soldier passive skill, weapons’ Fleetfoot passive skill, agility stats from memoirs and Karma I. - Provoker Tank: This role has a character skill that can “provoke” enemies and it’s available to use at the beginning of battle. This skill can draw attention from enemies so that enemies’ concentration will be lost. Along with the provoking, this skill will also reduce damage exerted by all enemies plus recovering HP when below a threshold so that other allies will survive enemies’ CDR. Choice of memoir must be ensuring as much HP as possible.
Provoker Tanks can use a non-proficient weapons to reduce animation time of provoking in exchange of less HP so that turret’s skill charging won’t be blocked for too long. - Attacker Support: This role will increase all allies’ attack and/or decrease all enemies’ defense. It can be either the role’s passive or character skill. Some attacker support costumes can increase critical rates and critical damage multipliers for all allies. Please note that increment of attack and decrement of defense have diminishing returns. Therefore, damage-up supporters are preferred to attack-up and defense-down supporters.
- Defender Support: This role will increase all allies’ defense and/or decrease all enemies attack. It can be either the role’s passive or character skill. Some defender support costumes can gradually heal all allies for a few turns by using the character skills. Please note that decrement of attack and increment of defense have diminishing returns. For example, even if you decreased enemies’ attack by more than 100%, your enemy can still deal damage.
- Sniper Support: This role will increase all allies’ agility by using the “Soldier” passive skill in order to help guarantee them having the first normal attack. They typically also play the role of turrets and other sorts of supporters.
- Compromiser: This role will disable special effects, including provoked state, dauntless state and healing-over-time, inflicted by the opponents by using the skill that can inflict “Compromised” state. This state must be inflicted toward the opponents before they inflict their effects.
Please note that “Compromised” state does not affect buffs inflicted by enemy. In arena, the usage of a compromiser is to ensure the turrets can annihilate most powerful and threatening attackers like atomic bombers and turrets. - Atomic Bomber: The goal of this role is to be as powerful as possible and ensure annihilation of enemy team. A good candidate of the main weapon choice should be EX weapons, especially with AOE skills like Pure Lotus IV and Four Season IV. Choice of memoir could be not using CDR, but to ensure 100% critical rate and as much damage multiplier as possible.
Common loadouts of a mature arena team would be:
- Hasty-CDR: All members in the team will equip CDR memoirs and quick-cooldown main weapons and also sub-slot weapons with “Haste” passive skills. “Swiftness” passive skills are preferred. For this loadout, the battle will have two or three normal attack turns before the turrets complete skill cooldown.
Please note that if both sides are using CDR and have similar agility, victory relies on how long the normal attack phase lasted. If normal attack phase lasted longer, offensive side will get their skills charged on first hand. Otherwise, the defensive side will get their skills charged on first hand. - Failsafe-CDR: Two members of the team will use a fairly-quick cooldown weapons. This means they won’t gain first-hand skills, but will try to gain more powerful attacks in their skills. Or they will gain first-hand skills, but might fail to annihilate the opponent’s deck. To ensure their survival, a Defender Support or a Provoker Tank is required for turret’s survival. With the presence of the a provoker tank, there would be only two turns of normal attacks in the battle. The provoker tank is recommended to be equip an non-proficient weapon in order to reduce the time it blocks the cooldown of weapon skills.
- Agile-CDR: Not only will the team equip CDR memoirs, one or more of the turrets will also play the role of agility sniper. This team is the archetype of risk-vs-reward. It could be very dangerous on both offensive and defensive.
- Anti-Tank CDR: One of the member will be a Compromiser and others will be playing the role of turrets. The CDR memoirs for turrets could be half-set, in order to gain more attack power. In other words, to use this deck, you’d better be confident that the enemy will have no CDR and be using tanks and healers. You must manually tap the Compromise skill in order to outspeed your enemy. Please note that it implies you will have only one turn of normal attack.
This team, if used on defense, is extremely dangerous because the enemy could identify this threat and use their character skills first or just use regular Full-CDR team instead. - Nuclear: One of the team should be an atomic bomber. For this kind of loadout, the team must ensure the survival of the Atomic Bomber due to its long cooldown. Therefore, one Provoker Tank plus one Defender Support is preferred for this kind of loadout. In order to protect atomic bomber, it is also recommended to make the Defender Support as agile as possible so that it will outspeed opponent agility sniper. It’s goal is not to take out an enemy, but to ensure the atomic bomber would survive.
This team, if used on defense, is very dangerous because the enemy could either use agility sniper to “defuse” the Atomic Bomb or use compromiser to deactivate the Provoker Tank. - Full Tankers: This team consists of three members: Celebratory Boor, Summer Ruler and Yuletide Hunter. For this loadout, do the following:
- Celebratory Boor should be full charged with HP and also double zombie skills. The zombie skill can come from Karma. Make him provoke as soon as possible.
- Summer Ruler will be defensive support and also use defense-skills to deal major damage. She should have DPS-level critical rate and damage multiplier. Her defensive-support skill should be charged right after Celebratory Boor provokes.
- Yuletide Hunter will be healer and also use defense-skills to deal major damage. She should have DPS-level critical rate and damage multiplier. Her healing skill should be charged once Celebratory Boor has taken more than five hits.
- Dauntless and Caged: The team requires Divine Boor because his character skill can drive everyone dauntless. He must be equipped with fast-charge dark-affinity weapons (e.g.: Blackhorn Hate) and as much agility as possible. His base agility is 1200 so agility supporters can boost his permanent agility very effectively. Then charge his character skill to drive everyone into dauntless state. By virtue of dauntless state, the other turrets can use dark-memory weapons to deal massive damage toward your enemies. There is no need to use Cooldown-Reduction memoirs on them. Caged-Vigor is recommended.
- Defense-Skill Turrets: Turrets in this team will use special weapons that have “defense skills”. (e.g.: Melancholy’s Blade and Imperial Fibula) For defense skills, the attack power in damage formula is replaced with defense power. As a result, debuffs like attack-down (e.g.: dealt by Celebratory Gunman, Celebratory Boor and Celebratory Captive) are ineffective against defense skills. Since such weapons typically cools down slower for defense skills (20 seconds, rather than 16 seconds for most turret weapons), it is recommended to put a Provoker Tank in order to protect the turrets if your opponents have CDR turrets. If your enemy will use an atomic bomber team (e.g.: Dark-Memory weapons for powerful damage), you may use an Agility Sniper with Blackhorn Spite (e.g.: Alternate Lad or Summer Weapon) to play the roles of Agility Sniper, Water Supporter and Provoker Tank.
Most defense-skill turrets, if built and used correctly, can deal lethal dose of damage toward a tank in one skill. Please note that Bloody Captain has damage-down (rather than attack-down) abilities, so you must spam his ability with normal attacks and support skills before using defense skills.
Please note that the purpose of Defense-Skill Turrets is to bypass the attack-down debuff. If your opponents do not inflict attack-down debuff, it is somehow meaningless to use the Defense-Skill Turrets.
Here is a list of great Defense-Skill Turrets:- Akeha: Abstract Assassin, Dissenting Assassin (Use Imperial Fibula)
- Argo: Reborn Adventurer (Use Blacksilk Grief; must have 100% HP so a healer is recommended)
- Lars: Bloody Soldier (Use Melancholy Blade)
- Griff: Reborn Has-Been (Use Melancholy Blade; must reach at least Awakening Level 3)
- Sarafa: Oathbound Belle (Use Melancholy Blade; boost her damage with Caged-Vigor passives)
- 2B: Praying Battler, Alternate Battler (Use Melancholy Blade)
- Kainé: Divergent Warrior (Use Melancholy Blade)
Please note: if there is a character who can use character skill from the beginning of the battle, there would be only two effective normal attacks at most. If one of your enemy is a Provoker Tank, you should either use agility snipers to kill the most powerful unit (especially in confronting an Atomic Bomber loadout) or inflict the “Compromised” state toward enemies to deactivate Provoker Tanks. It is extremely dangerous to place characters with such skills on defense teams since the offender can identify this threat and use their character skills on the first hand.
In many circumstances, companions are the last resort to win if both sides have survived the skill phase. Offensive side has the first hand if they tap the companion skill first. Otherwise, defensive side takes the first hand. On auto attack, the first companion skill is released from the left to the right. Therefore, companion on the left could be the key part of victory. Good defensive teams usually have a powerful DPS on the left with a companion that exerts hyper damage in order to annihilate the last person in offensive team. Offensive team should also always put the most powerful companion on the most powerful DPS, but the position is irrelevant: just make sure to do that on first hand.
Anti-Tank Strategy
Currently, there are four costumes for Provoker Tanks: New-Year Prisoner, Bloody Captain, Celebratory Boor and Oathbound Belle.
- New-Year Prisoner: As he provokes, his defense is increased by 50% for 30 seconds. Also, he will heal 20% HP for five turns. Note this is a part of his Character Skill: he will not have recovery in normal-attack phase. In other words, you can kill him in one skill if that’s powerful enough.
- Bloody Captain: As he provokes, the first five hits exerted to him will have damage being reduced by 90%. He also has a passive skill that will recover 100% HP when his damage goes below 50%.
- Celebratory Boor: As he provokes, opponents’ attacks will be decreased by 30% for 30 seconds. If he is equipped with Dark element weapon, opponents’ critical rate will be decreased by 50% for 30 seconds. He also has a passive skill that will recover 50% HP when his damage goes below 50%.
- Oathbound Belle: As she provokes, opponent’s attacks will be decreased by 30% for 45 seconds. If she is equipped with Water element weapon, she will also enter a 15-second dauntless state. She does not have passive skill that will recover HP under a threshold.
Following approaches are available to defeat Provoker Tanks:
- Use agility snipers to gain first hand. Kill the Provoker Tanks before they enter provoked state. If the team has both a tank and a healer, you should consider using a compromiser instead. If there are DPS, you should consider attacking DPS using agility sniper rather than the tank.
- Use a compromiser to deactivate the Provoker Tanks. Please note that defensive effects are still active even if they are compromised (e.g: defense-up, attack-down, etc.). Kill turrets and atomic bombs first, then deal with the provoker tanks. It is recommended to equip non-proficient weapons on compromisers in order to reduce the animation time that blocks your weapon skill cooldown.
- The “Provoke” status will expire in a number of turns they used to act. For example, if Celebratory Boor did two turns (e.g.: used one skill and one normal attack), his “provoke” status will expire and you can instead focus on others. This strategy will require you to build a very tanky team to survive your opponent’s skill waves.
- Celebratory Boor can decrease your attack power, so you can use defensive skills to work against him. Any weapons with “- Def.” suffix (e.g.: Melancholy’s Blade) skill will use defense power, instead of attack power, to exert damage. You can use Celebratory Gunman and/or Summer Ruler’s character skill to increase your defense power in order to enhance the damage from defensive skills. Due to his power to decrease your critical rates, you should work on powering up non-critical damages (e.g.: Elemental Boon, Pursuit, Bold Vigor, etc.) since increasing critical stats becomes diminishing returns.
- Bloody Captain will receive 5 hits with reduced-by-90% damage. So you can abuse this behavior and use lowest-power skills first (or normal attacks if their deck doesn’t have CDR) to spam his defense.
- New-Year Prisoner is an outdated Provoker Tank. Simply use the generic strategy to beat him.
- With the presence of Summer Ruler’s “Determination” skill, damages from the first five hits to will be reduced by 50% at the beginning of the wave. This makes agility snipers hard to kill. Although Defense-Skill is still feasible against such team, you need to properly adjust the skill order to spam her damage-down passive skill on whole team.
- Oathbound Belle can enter a dauntless state for 15 seconds which keeps her alive at 1HP. This amount of time usually costs three rounds of proficient weapon actions. The best approach is to inflict “Compromised” state on her so that her provoke and dauntless states are prevented.
If you don’t have a compromiser, you may spam her with proficient weapon attacks and stack attack buffs so that once her dauntless state expires, you can immediately kill her. The “Provoke-Expiry” approach is also viable by using Full-Tank team.
Please watch out for the zombie nature of the “Recovery” passive skill: when HP goes down to a threshold, the skill user will recover HP in next turn and won’t die during the heal. For example, when Bloody Captain’s HP goes down to 1%, his HP will recover to 100% without dying even if the next attack can claim 200% HP from him. As a result, a tank can equip an additional weapon with “Recovery” skill (e.g.: Machine Axe) which can heal 10% HP. In theory, it will prevent a tank from dying in two lethal skills. First, when a tank’s HP goes down between 50%-70%, he will survive a powerful attack twice. No matter how powerful the attack is, he will survive with 10% HP since the weapon’s “Recovery” passive skill is triggered. Then he will survive another turn since the character’s “Recovery” skill is triggered. With the presence of Karma feature, weapons with “Recovery” skill is not required. It can instead come from a karma slot.
However, duly note that “Nourishment” is different from “Recovery”: Nourishment passive skill does not prevent death in one round below threshold.
Anti-Sniper Strategy
There aren’t many very useful strategies to work against snipers.
- Build an even agiler sniper to outspeed enemy snipers.
- Use “Demon-tap” approach (frequently tap the skill button) to make the Provoker Tank to provoke before your opponent snipers start normal attacks. You have a few probability to outspeed your opponent agility snipers by using “Demon-tap” approach.
This team should be built as failsafe-CDR and the tank should be using a non-proficient weapon in order to reduce the animation time of character skill so that weapon skill cooldown won’t be blocked for too long.
Please note that permanent agility multiplier works based on your costume’s base agility. Most costumes have a base agility of 1000, so a 20% agility multiplier increases 200 agility, regardless of its source (rank bonus, memoir bonus, debris, passive skill, etc.). As a result, costumes with more than 1000 agility (e.g.: Abstract Ruler, Bloodless Gunman) will get more agility from agility multipliers (e.g.: Abstract Ruler has a basic permanent agility of 1244 due to her 1110 base agility, 100 rank bonus agility and 44 agility from 4% rank bonus). To calculate the agility in real fight, the formula is “Permanent Agility * (100% + Temporary Agility)”. In other words, the temporary agility passive skill has a different base of multiplier than permanent agility passive skill. However, please note that temporary agility is capped at 100%. Any more than that is ignored.
Please note that there is “Agility Roll” mechanism. If you have a similar agility to your opponent, you are not guaranteed to be gain first hand of normal attack.
The Dauntless Meta
Since January 2024, this game introduced a New Year’s costume for Sarafa. This costume significantly warped the meta of the arena of this game. Her character skill can be charged from the start of the game and enters a dauntless state for 60 seconds. On top of that, this skill will also consume 99% HP of her, driving her into perfect stance of Caged Vigor stage. She herself has a strong 80% dynamic Caged Vigor passive skill. If awakened to third phase, she will also unlock a 60% static Caged Vigor passive skill. On top of that, she will also gain a 20% static Caged Vigor if Karma II is applied. These make her an extremely powerful turret in arena.
Her dauntlessness does not require elements. This means she can use some provoker weapons (e.g.: Blackhorn Spite) to also play the tank role, because a dauntless character can be a perfect choice of a tank.
The dauntlessness can be prevented by using a compromiser. However, please note that the “Compromised” state is considered an ailment. Therefore, an ailment-cleanse skill (e.g.: Character Skill from Oathbound Exile) can remove the “Compromised” state so that Dauntlessness is still effective. In this regard, a team with both of them on defense could be extremely dangerous.
If you do not own a compromiser, you may use an agility sniper to kill her before she can become dauntless. To build your sniper, stack as much elemental boon, bold vigor and pursuit as possible. Do not use the CDR memoirs on your sniper. Instead, use PVE-style memoirs to give your sniper a very high amount of critical rate and damage multiplier.
Karma
Since August 2023, this game introduced a Karma system. Certain four-star costumes, when reached Lv.90, can be further enhanced via Karma. There are three slots of Karma:
- Karma I: This slot will grant you extra amount of stats. The available options depends on actual characters. For DPSes, desired options should boost Critical Rate and Critical Damage. For Arena Turrets and Snipers, Agility is desired. For Healers and Tanks, HP and Defense are desired.
- Karma II: This slot will grant you an extra passive skill or boost up your skill durations. The available options depend on actual characters. For DPSes and Arena Turrets, desired options should be Pursuit (Damage up on chain attacks). For Arena Snipers, desired options should be Bold Vigor (Damage up on high HP). For Tanks, desired options should be Recovery (Recover a few HP below a threshold). For healers and supporters, desired options should be duration extension of effects.
- The duration extension is limited to status-boosts effects. In other words:
- Attack-UP (Vigor and Valiance), Defense-UP (Aegis and Ward), Agility-UP (Fleetfoot and Soldier), Critical-Rate-UP (Ambush and Assault), and Critical-Damage-UP (Fatal and Lethal) are extended by this Karma.
- Attack-DOWN (Ripper), Defense-DOWN (Render), Agility-DOWN (Leadfoot), Critical-Rate-DOWN and Critical-Damage-DOWN are also extended by this Karma.
- Elemental-Damage-UP (Boon), Chain-Damage-UP (Ire and Onslaught), Defiance, Dauntless and Compromise are not extended by this Karma.
- Tanks only needs the lowest tier of Recovery Karma.
- The duration extension is limited to status-boosts effects. In other words:
- Karma III: This slot will grant you miscellaneous abilities. The available options depend on actual characters. Typically, you will pursue Skill cooldown time reduction for whatever characters you wish to enhance.
- Healers have an option that “Increases health restoration performed by 10%”. This is actually a useless option because it only applies on once-only healing skills. In other words, it’s only effective on Recovery-like skills instead of Nourishment-like skills.
- Tanks may should seek other options (e.g.: Mastery, increases normal-attack to be 3-chain or more for all allies) because their provoking state might expire if they charge their skills too soon. Exceptions can be made if they will also be a turret (e.g.: Oathbound Belle as def-skill turret).
Memoirs
Memoirs can make huge differences for players. There are two sources to obtain memoirs: Dungeon Quests and Variation Events. In most circumstances, you will be farming memoirs from Dungeon Quests because memoirs dropped from Dungeons are typically better.
You need to enable “Auto Sell” options in order to filter out low-level memoirs so that your inventory won’t be filled with crappy memoirs. It is recommended to farm memoirs when you can consistently auto-repeat the deepest level of dungeon. If you can’t auto-repeat it consistently, do not farm the dungeon or use skip tickets to farm.
The goal of farming memoirs:
- You need to pursue 100% critical rate and as much critical damage as possible for your DPS. You must not use set bonus for them.
- You need to pursue as much HP as possible for your tank.
- You need to pursue a higher HP for your healer, but she should also be able to provide you certain supports (e.g.: increase Team max HP or attack).
- You need to use “Blighted Flowers” set to shorten your turrets’ skill cooldown time in arena. It will be hard to ensure 100% critical rate for them. The main abilities of their memoirs should pursue attack percentage, critical rate and agility. The secondary abilities of their memoirs should pursue as much critical stats as possible.
- Note: if you expect your opponent has a slow charge rate, you can instead use a small set bonus instead so that you will gain higher critical rates but you can still charge faster than your opponent.
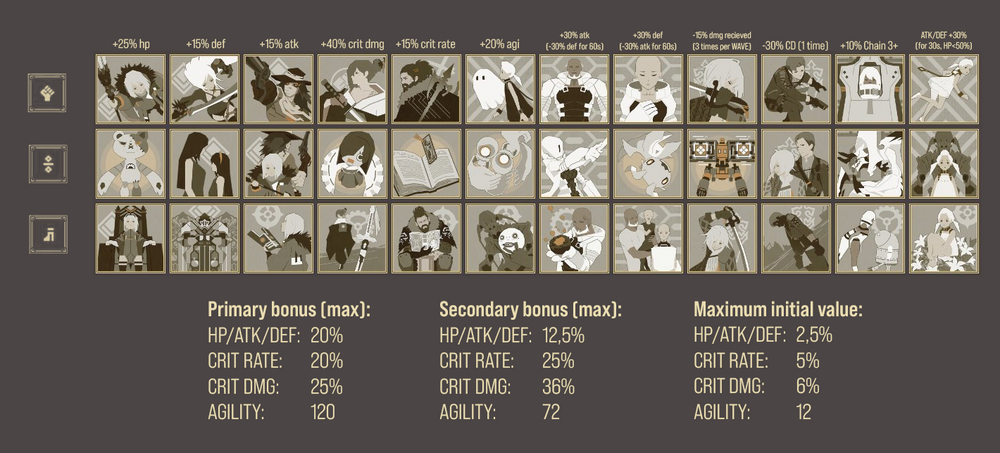
The above image illustrates how the memoir works.
- The first row can only grant you enhancement of attack power, defense power and health on primary ability. They can be percentage-based multiplier or flat number addition. It is usually recommended to keep multiplier memoirs since the enhancement can be greater than flat memoirs.
If you obtained 4-star memoirs for them, maximum ability of HP/Attack/Defense will be 20%. - The second row can grant you extra critical rate and critical damage multiplier as primary ability.
If you obtained 4-star memoirs for them, maximum ability of Critical Rate is 20% and Critical Damage Multiplier is 25%. Only memoirs on this row can grant critical stats as main ability! - The third row can grant you extra agility as primary agility. There is no multiplier memoirs for Agility.
If you obtained 4-star memoirs for them, maximum ability of Agility is 120. Only memoirs on this row can grant agility stats as main ability! - Memoirs from Variation Events do not have agility and critical stats as primary abilities.
- All memoirs can have various kinds of secondary abilities. They can include bonus effects like critical rate, critical damage and agility. You need to keep an eye on their initial value. If the value matches to the image above (e.g.: You got a memoir with initial critical rate of 5% as secondary ability), this memoir is worth to keep and enhance.
- You need to enable Auto-Select feature to sell unwanted 4-star memoirs. Memoirs with HP/Attack/Defense flat additions as primary abilities typically do not worth to keep, unless you find this piece memoir has great abilities (maximum initial value for critical-rate, critical damage and agility).
- In most circumstances, Memoirs with Defense multiplier as primary ability are also useless, unless you need to use them on defense skills. In that regard, you must also check the secondary abilities for defense power, critical rates and critical multiplier (and agility if you wish to use in arena).
- Memoirs with HP multiplier as primary ability are only useful for tanks, healers and supporters. You must check for HP multipliers and Defense multipliers as secondary abilities.
- Tanks should equip a full set of “The Young Lord’s Studies” memoirs in order to gain as much HP as possible for themselves, in that they will be taking damage alone.
- Healers should equip a full set of “Forbidden Tomes of Thaumaturgy” memoirs in order to grant extra HP on all allies so that healing skills could be more effective.
- Attack Supporters should equip a full set of “Seafaring Cradle Tales” memoirs in order to grant extra Attack Power on all allies. HP multiplier as primary ability is intended only for the survival of themselves.
- The “Dungeon: Aberrant Memories” could be the most frequent dungeon you will be farming in that it produces “Blighted Flowers” set of memoirs. This is one of the special cases where you will be using full set of memoir for bonus: it reduces cooldown time at the start of battle, which is extremely helpful in arena. Players who use 1-star of this set can screw up most newbie whales because their weapon skills are quicker so that the opponent will be skewered with skills.
To build a set of this memoir, you must ensure the three memoirs have attack power multiplier, agility adder and critical rate adder as main primary abilities. It is preferred to make the secondary abilities to increase the attack, agility and critical stats. However, such perfect pieces are extremely rare.
Monthly Pass
Since May 2023, this game introduced a system called Monthly Pass. There are several missions you may complete. Completing missions will grant you mission points, and when the points reaches a threshold, you may claim certain rewards. There are two tiers of rewards: Standard and Premium. To claim Premium Monthly Pass rewards, you will have to purchase a Premium Monthly Pass. The only worth point of this Premium monthly pass is the final reward: Awakening Stone Exchange Medal, which can be exchanged for an arbitrary character’s awakening stone.
To fully complete the monthly pass missions, you are required to play the game for at least six days in the current month. If you are unable to do so (e.g.: you just started playing on 27th of the month), do not purchase the Premium Monthly Pass.
Friends
This game has a friend system. You can add any user in this game. You cannot chat with each other, though. You can send and receive “support” to and from the friends you added. Each send and receive will grant you one more point of stamina. You can add up to 100 friends. In order to receive most amount of support, you should regularly delete friends who hasn’t been logging in. Here is a small tip: you may observe the player’s rank of arena and level to judge if the player has potential to get back.
Choosing the avatar is important to attracting friend requests. For example, I prefer adding players with avatars of Akeha, Hina, 2B, Zero or Queen.
Miscellaneous & Summary
This website contains a quite comprehensive list of specs.
You should re-traverse The Cage regularly. The purpose for re-traversal is to pick up the lost items and to shoo the fickle black birds away. Doing so may offer you unexpectedly-valuable rewards (e.g.: 10000 Dark Coins, Advanced Handbooks, etc.) sometimes.
This blog should have offered you some important tips about running your account of this game.